Last Updated: 2024-01-28
Background
Finding the correct cluster size is an exercise in balance between the improved performance of larger clusters and the lower costs of smaller ones. However, determining the optimal cluster size quickly becomes complicated owing to variability in the number, type, and size of queries running on the organization's clusters.
In such cases, data architects and data engineers must either construct clusters large enough to handle periods of high activity or accept that queries will take longer to run during those periods.
Starburst Galaxy cluster autoscaling
To address this challenge, Starburst Galaxy offers cluster autoscaling. This feature allows clusters to dynamically and automatically scale according to the current query load. With cluster autoscaling, you can choose a predetermined range of cluster sizes that suit your needs, with the system optimizing for the correct conditions. This results in both cost and time savings.
Non-disruptive scaling
In this tutorial, you will learn how to use non-disruptive cluster autoscaling capabilities to automatically adjust the size of your Starburst Galaxy cluster based on workload demands. You will also explore the manual options. This will allow you to optimize resource utilization and enhance scalability.
Prerequisites
You need a Starburst Galaxy account to complete this tutorial. Please be sure to complete the tutorial titled Starburst Galaxy: Getting started before attempting this tutorial.
Learning outcomes
Upon successful completion of this tutorial, you will be able to:
- Explain the concept of cluster autoscaling and its significance in optimizing resource utilization.
- Configure an autoscaling cluster in Starburst Galaxy.
- Simulate different workload scenarios to observe autoscaling in action.
- Manually scale a cluster in various ways.
About Starburst tutorials
Starburst tutorials are designed to get you up and running quickly by providing bite-sized, hands-on educational resources. Each tutorial explores a single feature or topic through a series of guided, step-by-step instructions.
As you navigate through the tutorial you should follow along using your own Starburst Galaxy account. This will help consolidate the learning process by mixing theory and practice.
Tutorial scenario
You are part of a team responsible for managing the infrastructure of Tharsis, a popular e-commerce business that uses Starburst Galaxy as its data lake analytics platform. During peak shopping seasons, such as Black Friday or holiday sales, the platform experiences a significant surge in traffic and transactions.
To ensure a seamless shopping experience for customers and maintain high-performance levels, you need to implement cluster autoscaling to dynamically scale the infrastructure based on workload demands. Help your team by testing out the different scaling methods in Starburst Galaxy.
By engaging in this real-world scenario, you will gain practical experience in implementing autoscaling and manual scaling for a Starburst Galaxy cluster.
Background
Starburst Galaxy's approach to cluster scaling is non-disruptive, increasing and decreasing resources as needed without shutting down the cluster.
These include the following three methods:
- Autoscaling the cluster
- Manual cluster scaling
- Movement between cluster tiers
Autoscaling the cluster
The first way to enable non-disruptive cluster scaling is through cluster autoscaling. This is by far the most automatic option. It occurs in two ways:
- Autoscaling up
- Autoscaling down
Autoscaling up
Starburst Galaxy identifies when a cluster requires extra resources by measuring the CPU usage of all workers in the cluster.
If this combined CPU usage exceeds 60%, then workers will be added one-by-one until this usage has dropped below the threshold. Importantly, this process occurs iteratively, with each new worker being added every 4 minutes until CPU usage drops below the 60% threshold. If the CPU continues to climb and goes above 60% again, the process will be repeated until the MAX number of workers is reached.
Autoscaling down
The process also works in reverse. Starburst Galaxy monitors clusters to determine whether CPU usage across all workers consistently drops below the 60% threshold.
In such cases, workers will be removed from the cluster one-by-one, until the usage increases. Again, this process occurs iteratively, and the process to remove each worker takes approximately 15 minutes.
Manually updating the cluster configuration
Starburst Galaxy also allows for manual cluster scaling. Similar to autoscaling, this process is non-disruptive. Resources can be added or removed in running clusters.
Clusters are configured with a MAX and MIN value. These values can be manually updated to scale resources up or down. In each case, the cluster will be updated dynamically, with the new resources either added or removed.
Adjust the MIN value
The MIN value controls the minimum number of resources allocated to a cluster.
- If the MIN value is increased, new workers will be added to the cluster.
- If the MIN value is decreased, workers will be removed from the cluster if the current number of workers exceeds the new minimum.
Adjust the MAX value
The MAX value controls the maximum number of resources allocated to a cluster.
- If the MAX value is increased, new workers will be added to the cluster.
- If the MAX value is decreased, new workers will be removed to the cluster if the current number of workers exceeds the new maximum.
Special Case: Updating the Starburst Galaxy tier
Starburst Galaxy also allows running clusters to dynamically shift between the free tier and other tiers.
To facilitate this transition, the following process takes place:
- The initial cluster will continue any running queries, and a new cluster with the new tier size will be deployed.
- Once the new cluster is running, all new queries are allocated to it.
- The old cluster will remain running for four hours. This allows any older queries to complete successfully.
Note: If a query takes more than 4 hours to complete, it will be canceled.
Background
Cluster scaling requires the creation of a new cluster with a different resource allocation. You're going to create this new cluster, and then test it using autoscaling.
Watch the following to see a run-through of the tutorial. In the next sections, you're going to then complete the steps on your own.
Background
You're going to begin by signing in to Starburst Galaxy and setting your role before you begin working with autoscaling.
This is a quick step, but an important one.
Step 1: Sign into Starburst Galaxy
Sign into Starburst Galaxy in the usual way. If you have not already set up an account, you can do that here.
Step 2: Set your role
Starburst Galaxy separates users by role. Configuring a new catalog will require access to a role with appropriate privileges. Today, you'll be using the accountadmin role.
Your current role is listed in the top right-hand corner of the screen.
- Check your role, to ensure that it is set to accountadmin.
- If it is set to anything else, use the drop-down menu to select the correct role.

Background
In this section, you will create a new test cluster that is capable of autoscaling. You have determined that during peak usage, your platform requires at least four workers to handle the cluster workload. Therefore, you will set the range of workers between 1 and 4.
In the next section, you will run several simultaneous queries. This will force the workers to scale up, enabling you to see autoscaling in action.
Step 1: Create a new cluster
To get started, create a new cluster in the usual manner.
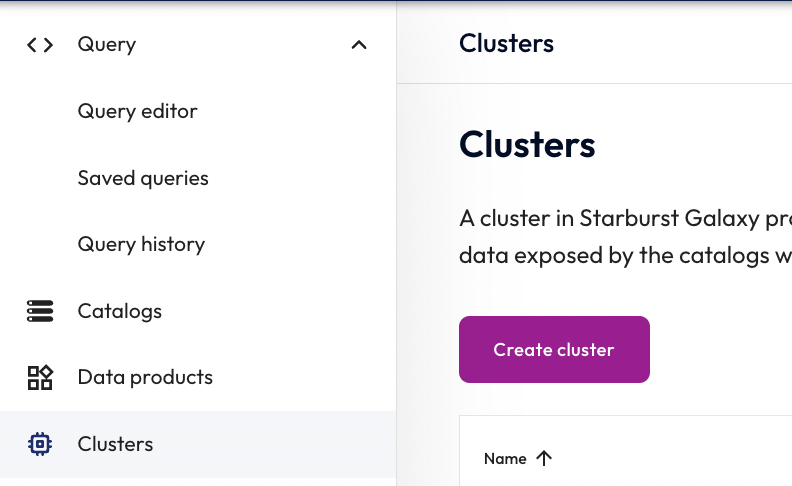
- Using the left-hand navigation menu, select Clusters.
- Click the Create cluster button.
Step 2: Configure the cluster
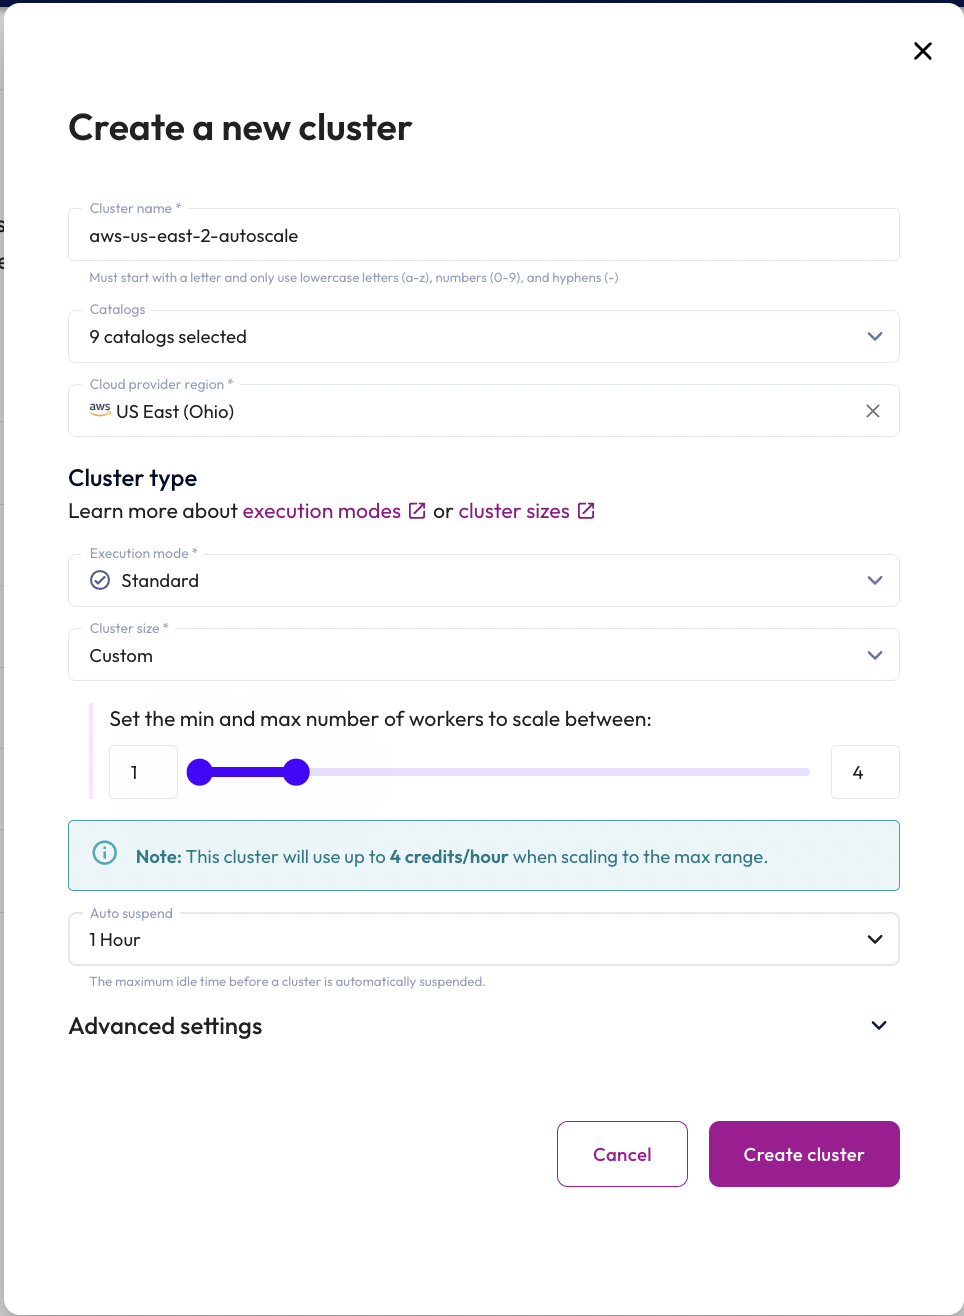
Next, you need to configure the new cluster. You'll need to ensure that the correct minimum and maximum cluster size is selected to facilitate your autoscaling tests later in this tutorial.
Use the following configuration.
Note: You will be using the tpch catalog for testing.
- In the Cluster name field, enter
aws-us-east-2-autoscale. - In the Catalogs menu, select all available catalogs in
us-east-2. - In the Cloud provider region field, select AWS US East (Ohio).
- In the Execution mode field, select Standard.
- In the Cluster Size field, select Custom.
- Set the Min to 1 and Max to 4.
- In the Idle shutdown time field, select 1 Hour.
- Click the Create cluster button.
Step 3: Wait for clusters to start
Clusters take several minutes to initialize. While the cluster is being created, its status will be set to Starting.
- Wait for the cluster status to be set to Running.


Background
In this section, you will execute SQL to force your cluster to scale up and down. You will monitor the cluster while this is happening.
Watch the video below, then complete the steps on your own.
Step 1: Open Cluster Overview
Ok, your cluster is created! It's time to look inside it to see what's going on.
Starburst Galaxy includes a Cluster Overview section to view cluster activity. This includes information about the Min and Max cluster scaling.
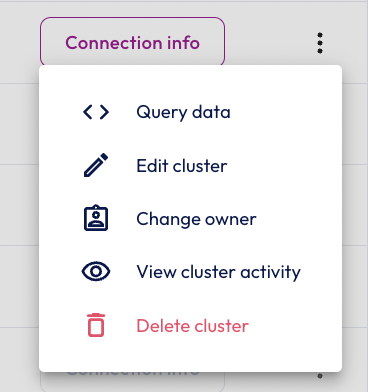
- Click the ellipses for the new
aws-us-east-2-autoscalecluster to display the cluster menu. - Select View cluster activity.
- The Cluster Overview will open in a new tab.
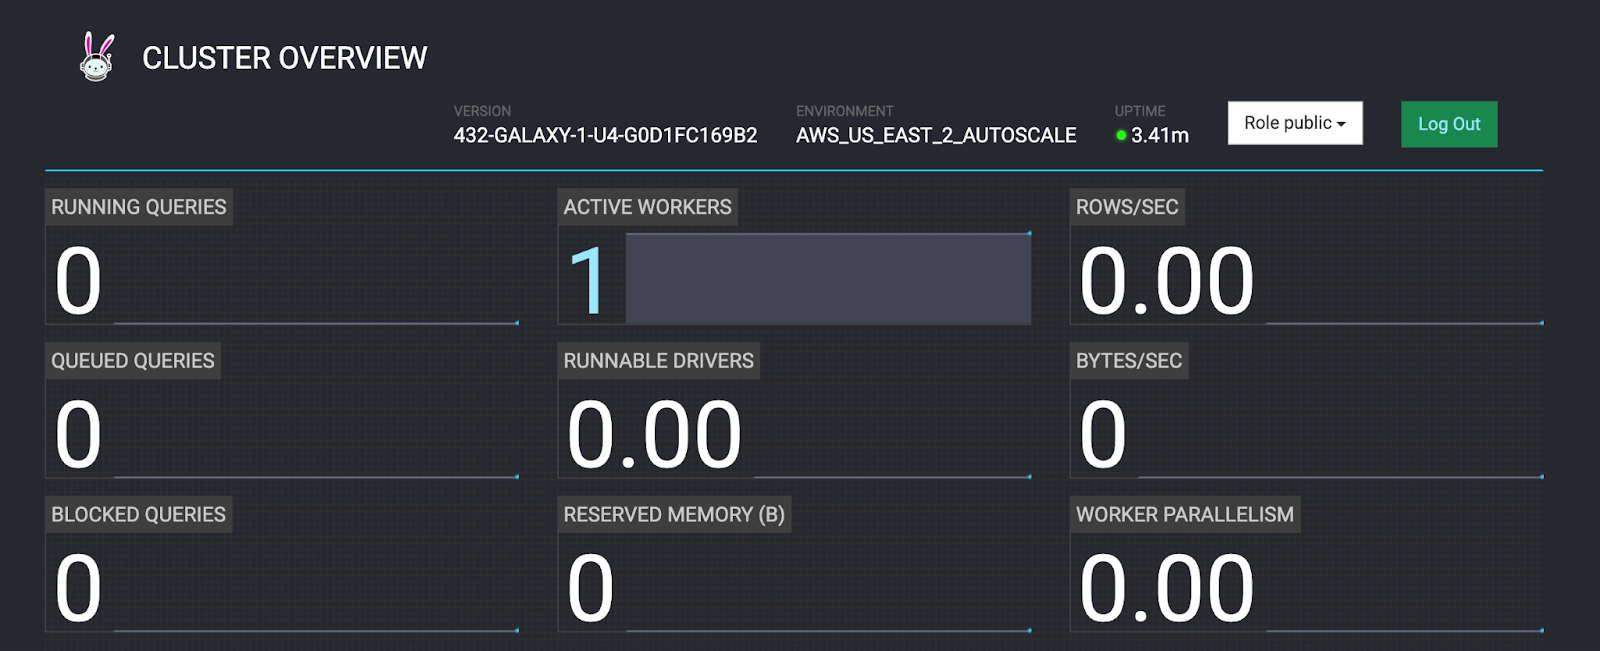
- Notice you currently have 1 running worker. This is exactly what you'd expect because you've assigned a cluster configuration with a Min of 1 and a Max of 4.
Since the cluster is already at the Min, and there are no workloads exceeding 60% of the combined CPU of all workers, there is currently no reason for the cluster to scale up or down.
Step 2: Increase workload to force autoscaling
It's time to stress your cluster out by adding a large workload. This will invoke the conditions needed to see autoscaling in action.
To do this, you are going to simultaneously run the same query in three Query editor tabs. This will create a lot of sudden work for the cluster, which will force autoscaling.
- In the Starburst Galaxy tab, click the ellipses again to view the cluster menu for the
aws-us-east-2-autoscalecluster. - Select Query data.
Step 3: Run the first query
It's time to run the first query. Remember that you're going to run this same query three times simultaneously in three separate query tabs to create a spike in workload.
To do this, you'll need to complete this step and the two next steps in quick succession.
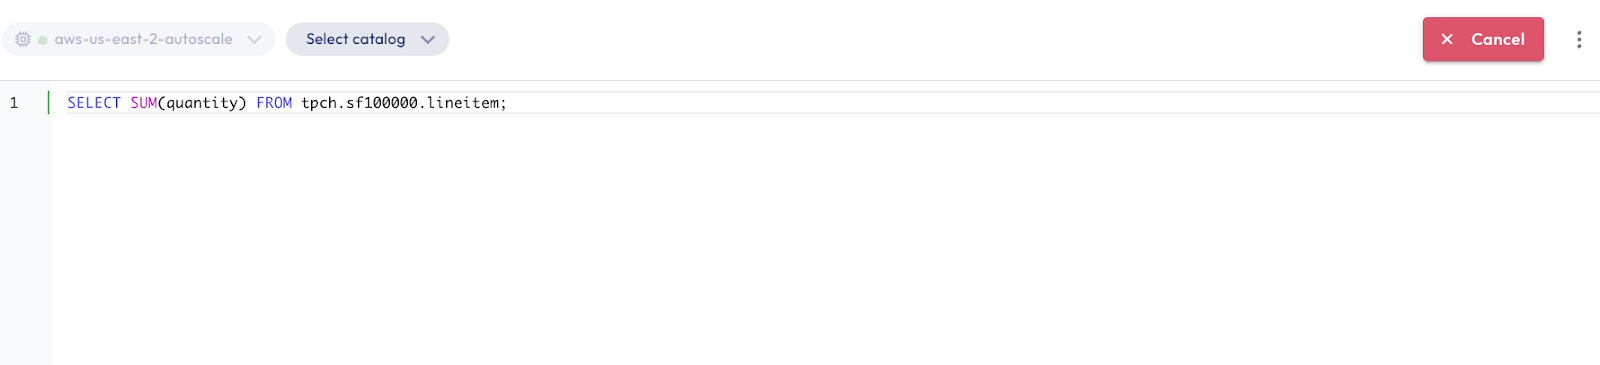
- Copy the following SQL command into the Query editor, and click Run selected (limit 1000).
- Move to the next step quickly.
SELECT SUM(quantity) FROM tpch.sf100000.lineitem;
Step 4: Run the second query
Quickly run the second query in a second query tab. This will cause both queries to run simultaneously.
- Open a second query tab.
- Select the
aws-us-east-2-autoscalecluster from the cluster drop-down menu. - Copy the same SQL command into the Query editor, and click Run selected (limit 1000).
- Move to the next step quickly.
SELECT SUM(quantity) FROM tpch.sf100000.lineitem;Step 5: Run the third query
Now it's time to add the third query in a third query tab. Running all three queries simultaneously will cause a spike in workload, triggering autoscaling.
- Open a third query tab.
- Select the
aws-us-east-2-autoscalecluster from the cluster drop-down menu. - Copy the following SQL command into the Query editor, and click Run selected (limit 1000).
- At this point you should have three running queries, similar to the image below.
SELECT SUM(quantity) FROM tpch.sf100000.lineitem;
Step 6: Watch the cluster scale up
You are going to watch as autoscaling occurs, adding an extra worker to compensate for the CPU load caused by the three simultaneous SQL statements.
It takes between 4 and 5 minutes to add the second worker.
The three SQL statements will cause the CPU on the single worker to reach 60% very quickly. It takes between 4 and 5 minutes to see a second worker because that is the time it takes a cloud vendor to both respond to a provisioning request and complete the hardware validation checks to ensure the worker is properly online.
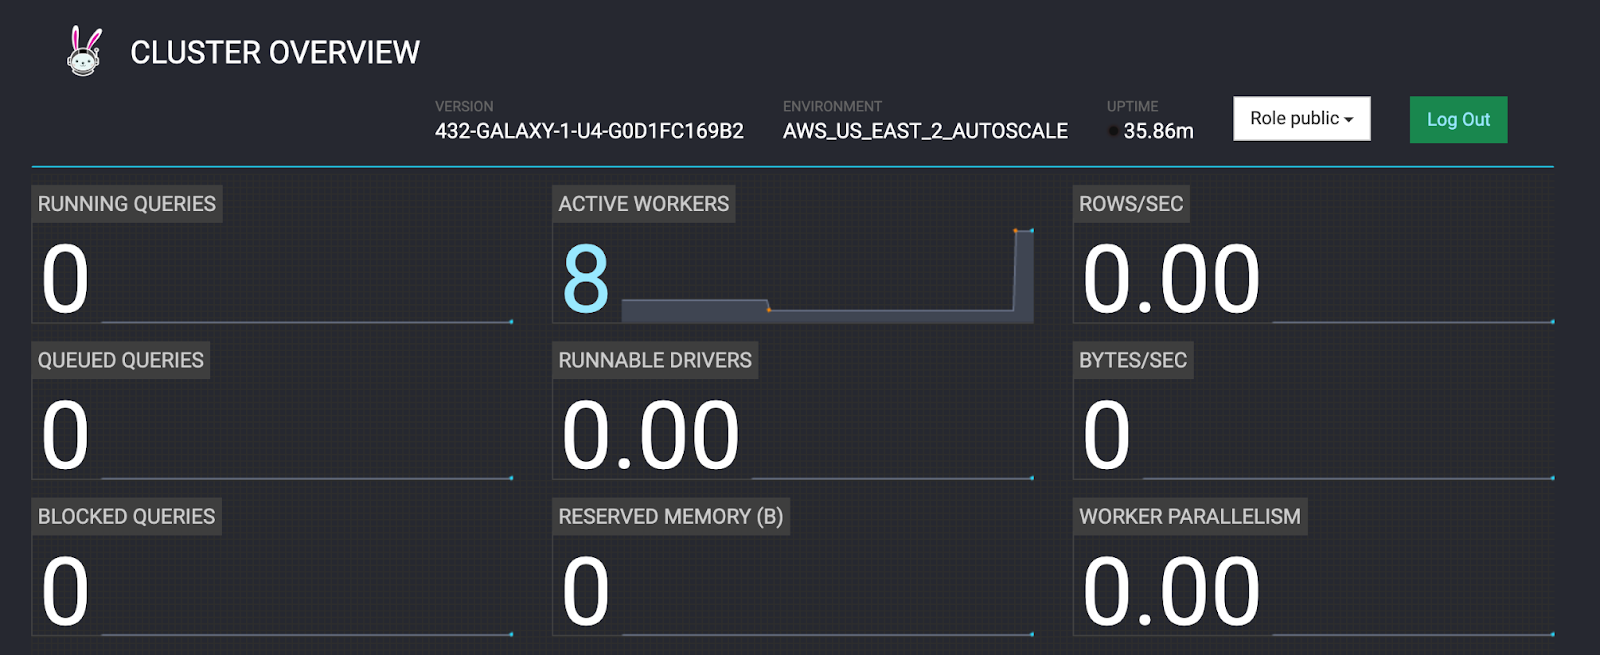
- Select the Cluster Overview tab.
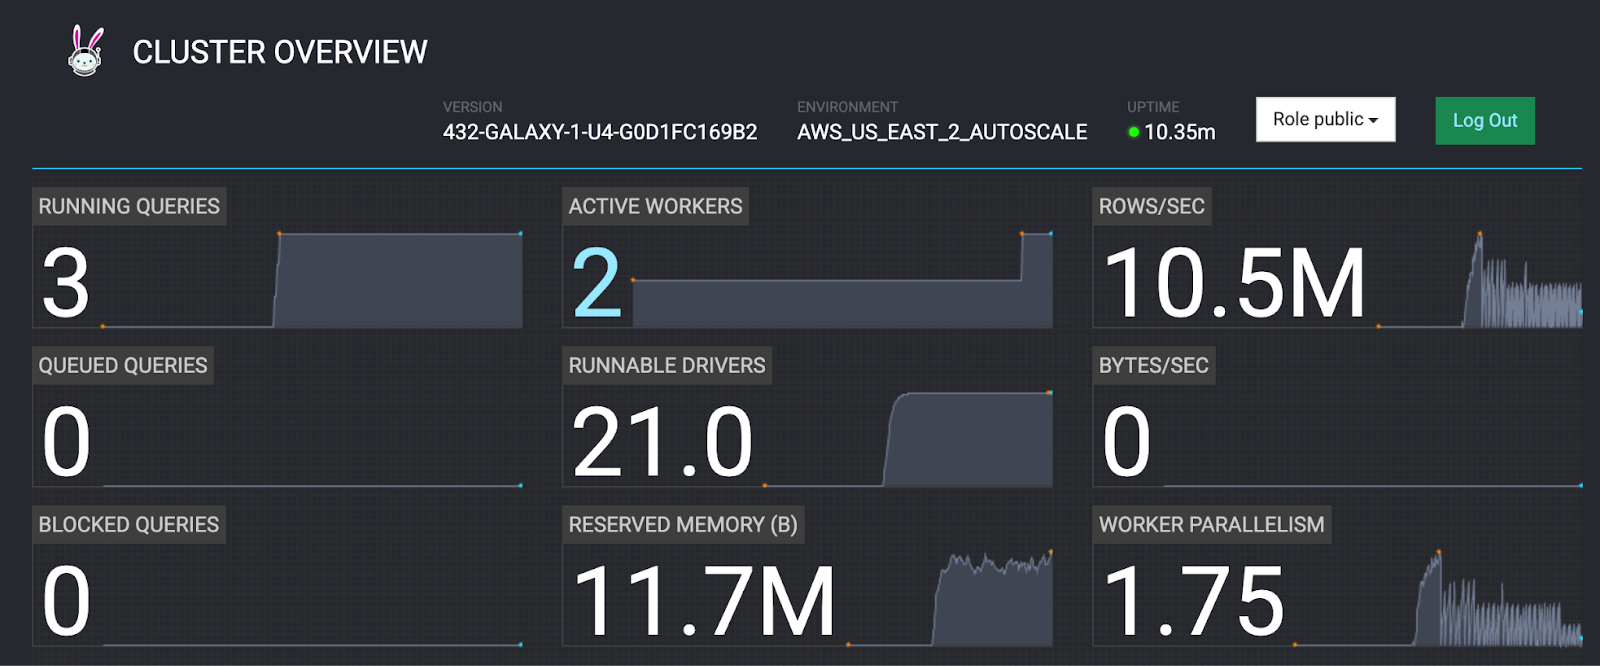
- The RUNNING QUERIES field should show 3 running queries.
- Wait several minutes for the ACTIVE WORKERS section to show 2 workers.
- As soon as the second worker is added, move on to the next step.
Step 7: Cancel running queries
You've seen how resources can be increased, it's time to see them decrease.
To do this, you are going to reduce the workload for the cluster below the 60% threshold, triggering the shutdown of the extra worker that was added in the previous step.
- Return to the Starburst Galaxy tab.
- Cancel each of the three running queries.
- You should now have no running queries.
Step 8: Watch the cluster scale down
You've created the conditions for the cluster to begin an automatic scaledown. It will take between 15 and 20 minutes for this process to complete. As noted at the beginning of this tutorial, scaling down takes longer than scaling up to prevent the unwanted behavior known as flapping.
All scaledown events allow for the non-disruptive shutdown of workers. If this was a production cluster running SQL, it could take longer to scale down if SQL fragments were running across all workers.
- Return to the Cluster Overview tab.
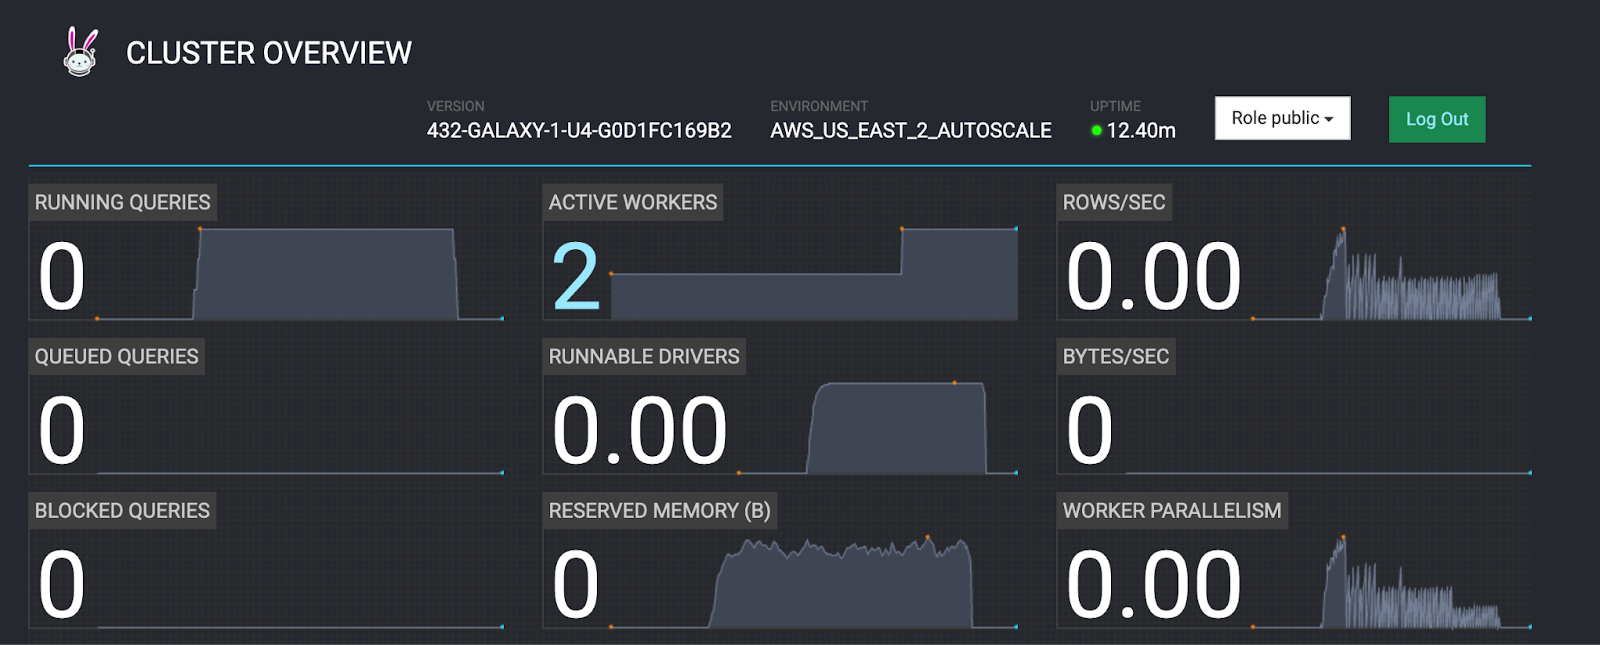
- The RUNNING QUERIES field should now show 0 queries running.
- The ACTIVE WORKERS field should still show 2 active workers.
- Notice that the cluster UPTIME is 12.40m in the screenshot below.
- Wait several minutes for the ACTIVE WORKERS section to show 1 worker.
Background
It's time to turn your attention to manual cluster scaling. Like autoscaling, this process is also non-disruptive. Unlike autoscaling, there is more direct involvement in the manual process.
To test this, you are going to monitor your cluster while you manually scale it up and down.
Watch the video below to see the process demonstrated, then complete the following steps on your own.
Step 1: Edit cluster
You're going to use the same cluster that you created earlier in this tutorial to test manual scaling.
- In the Starburst Galaxy tab, click the ellipses again to view the cluster menu for the
aws-us-east-2-autoscalecluster. - Select Edit cluster.
Step 1: Manually increase the minimum number of workers
Time to test manual scaling by forcing a manual increase in the minimum number of workers.
- In the Cluster size field, change the min value from 1 to 3.
- Click the Save changes button.
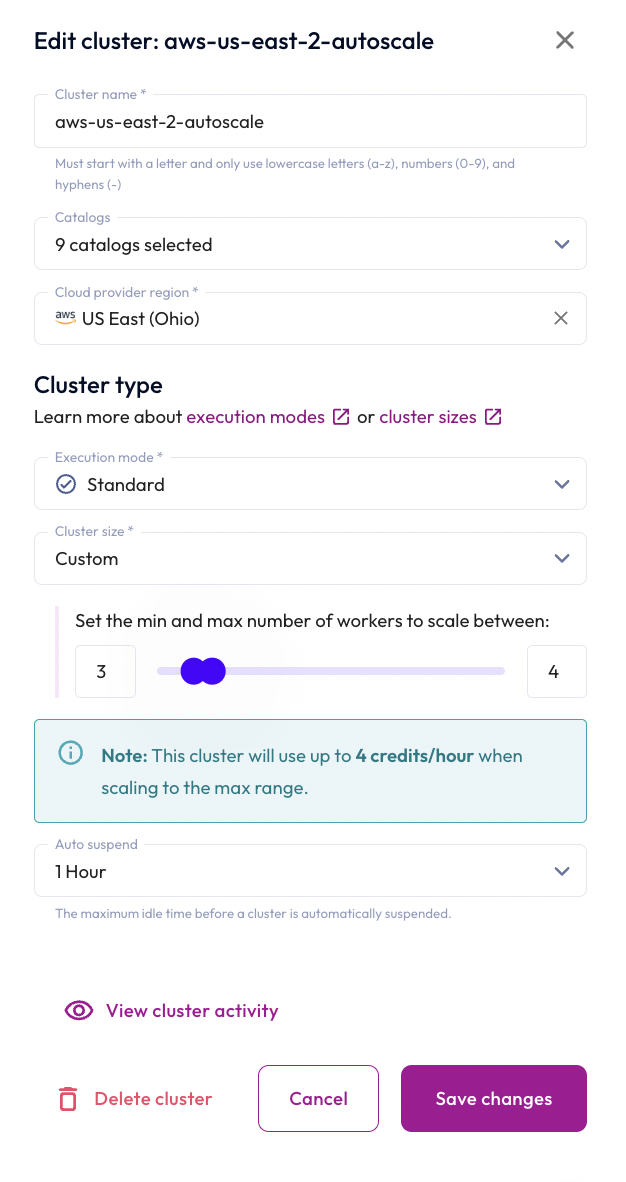
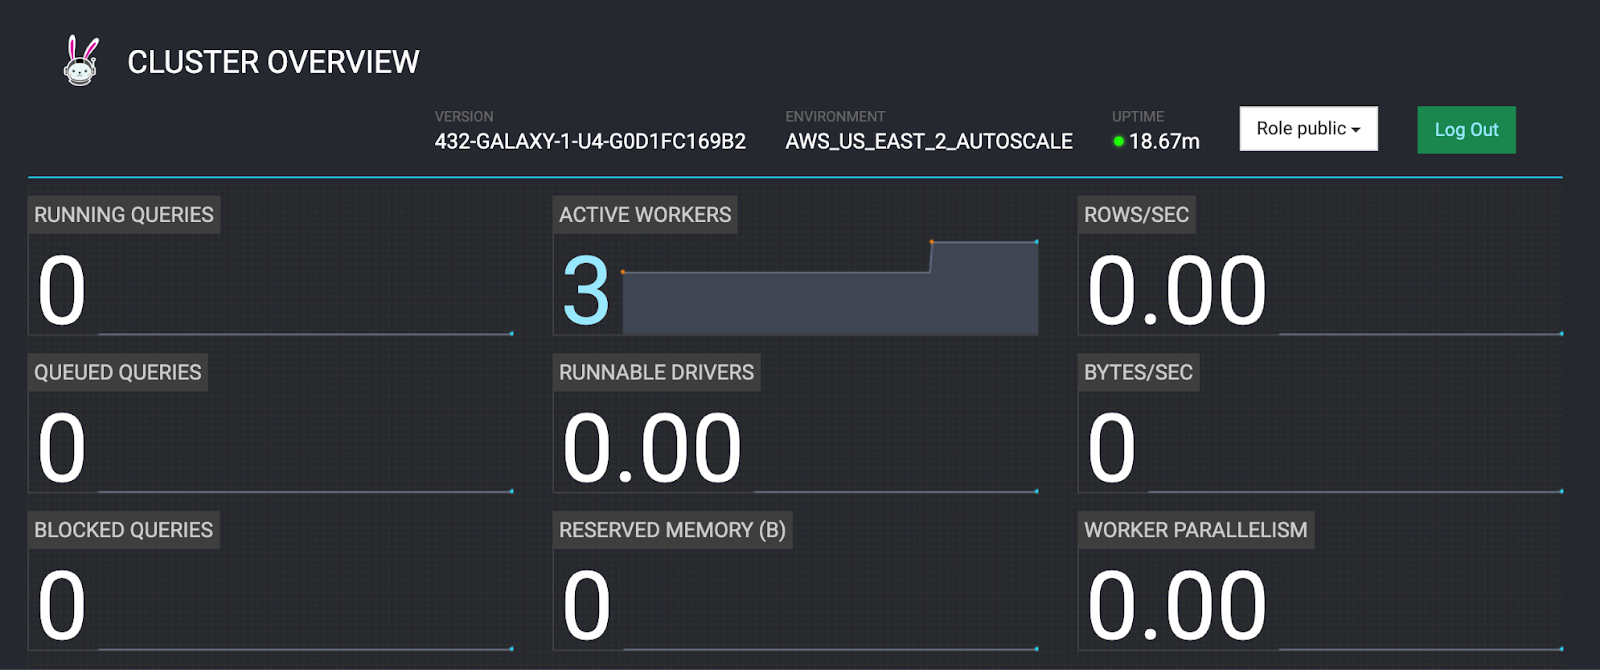
Step 3: Monitor the manual scaleup
Although there are no queries running, the cluster will add workers because you increased the minimum number manually. This differs from autoscaling, which takes into account cluster workload.
As before, it takes between 4 and 5 minutes for the new worker(s) to be added.
- Return to the Cluster Overview tab.
- Wait for the ACTIVE WORKERS section to report 3 active workers.
Step 4: Edit cluster
Time to try the process in reverse, reducing the minimum number of workers.
As before, this process begins by editing the cluster.
- In the Starburst Galaxy tab, click the ellipses again to view the cluster menu for the
aws-us-east-2-autoscalecluster. - Select Edit cluster.
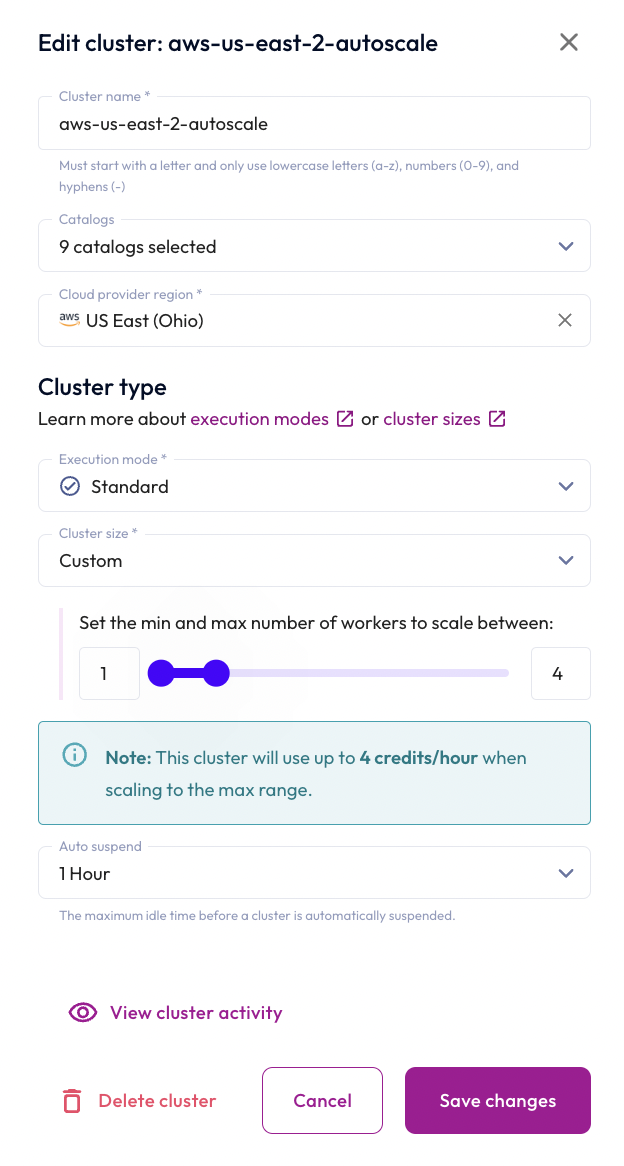
Step 5: Edit the min number of workers
When you manually adjust the min setting on the cluster configuration, the cluster will work to scale down in a non-disruptive manner.
All scale-down events allow for the graceful shutdown of workers. If this was a production cluster running SQL, it could take longer to scale down if SQL fragments were running across all workers.
- In the Cluster size field, change the min value from 3 to 1.
- Click the Save changes button.
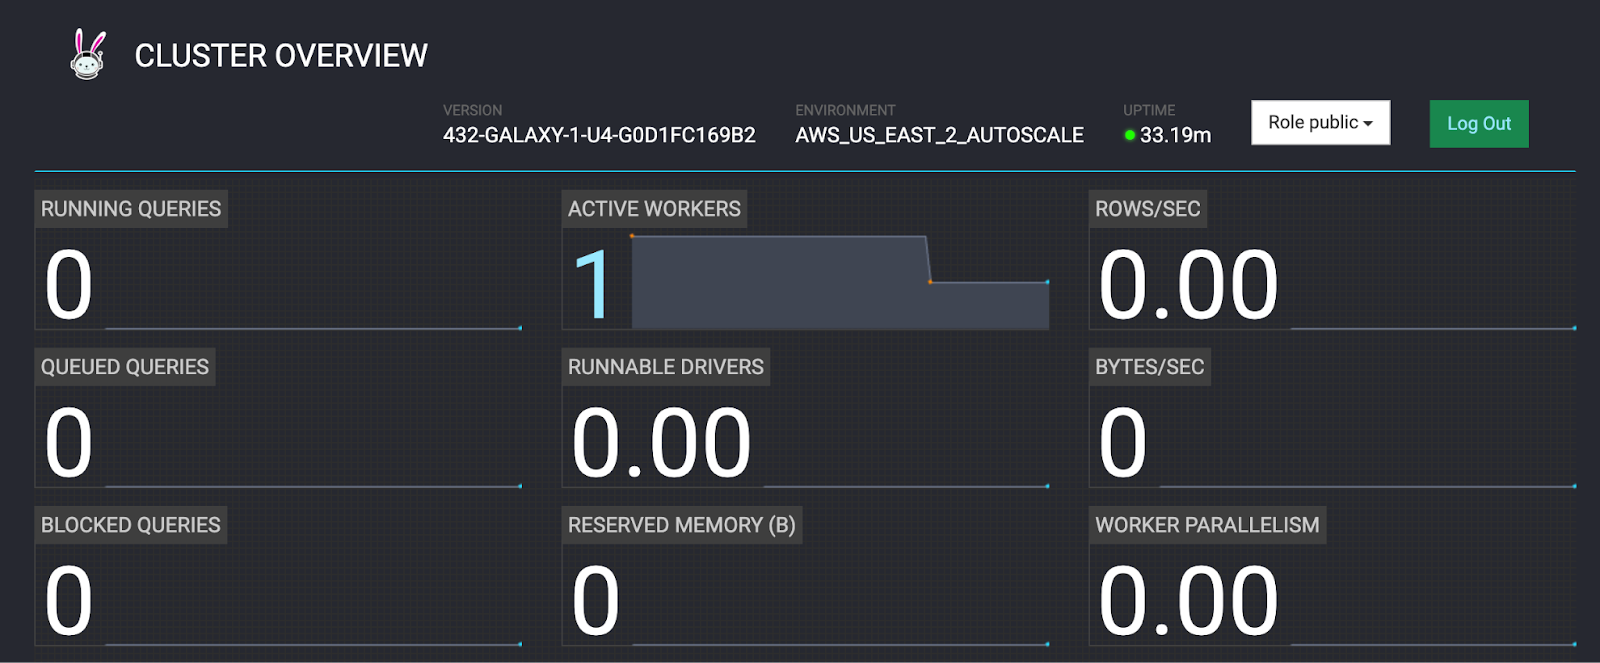
Step 6: Monitor the scaledown using Cluster Overview
The changes you've made to the cluster will be reflected in the Cluster Overview dashboard.
Remember that scaledown takes longer to execute than scaleup, so it will take 30 minutes or more for the changes to take effect.
- Return to the Cluster Overview tab
- Wait until the ACTIVE WORKERS field reports 1 active worker.
Background
Starburst Galaxy allows non-disruptive cluster scaling between cluster sizes.
To test this, you will set the min and max to the same value so that the only scaling that will occur is the manual scaling you are invoking by changing the cluster size.
Step 1: Edit cluster
You will use the same cluster from earlier in this tutorial, and edit it to invoke scaling of cluster size.
- In the Starburst Galaxy tab, click the ellipses to view the cluster menu for the
aws-us-east-2-autoscalecluster. - Select Edit cluster.
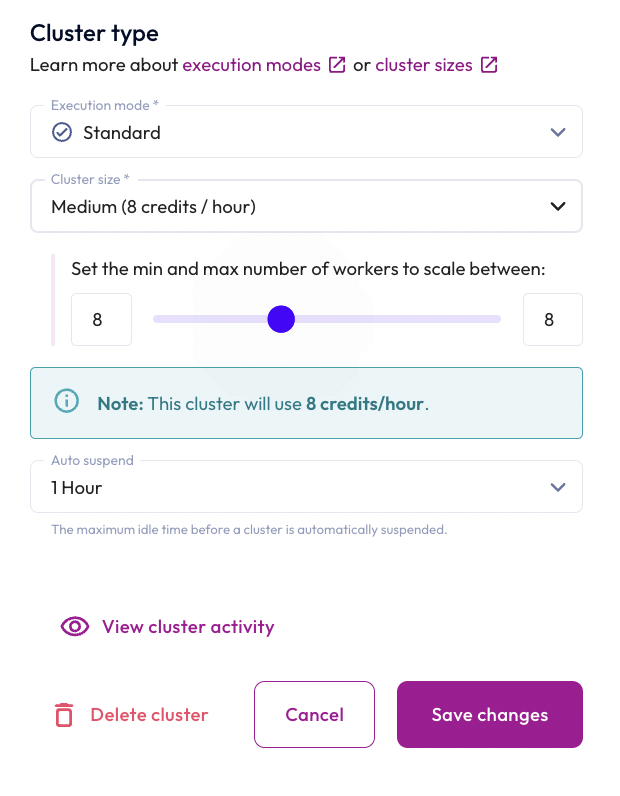
Step 2: Change the cluster size to Medium
You're going to begin by manually changing the cluster size to Medium.
- In the Cluster size field, select Medium (8 credits / hour).
- Click the Save changes button.
Step 3: Monitor the scaleup using Cluster Overview
It takes between 4 and 5 minutes for the new worker(s) to be added.
- Return to the Cluster Overview tab to monitor the scaleup process.
- Move on to the next step when complete.
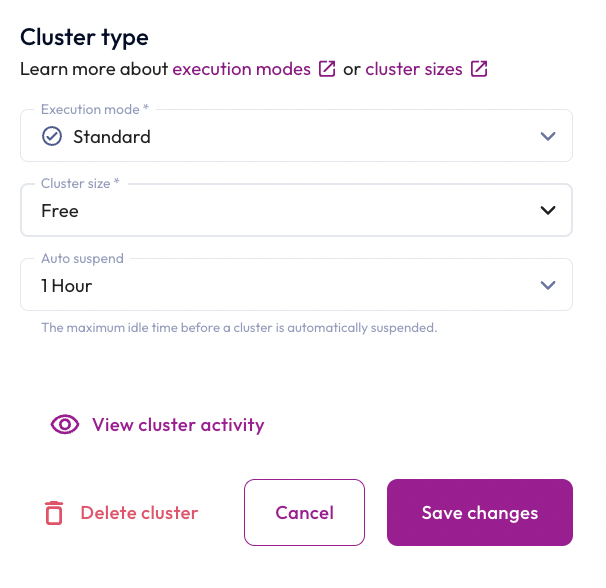
Step 4: Edit cluster to switch to free tier
Now you're going to go in the opposite direction, switching from the Medium tier to the Free tier.
Again, you will need to edit the cluster to make this change. In the Starburst Galaxy tab, click the ellipses to view the cluster menu for the aws-us-east-2-autoscale cluster.
- Select Edit cluster.
Step 5: Change the cluster size to Free
Switching between a Medium cluster and a free one requires a new cluster to be created with a different number of workers and different associated costs.
In such cases, the old cluster will remain running for up to four hours, allowing time for any queries already running to complete.
- In the Cluster size field, select Free.
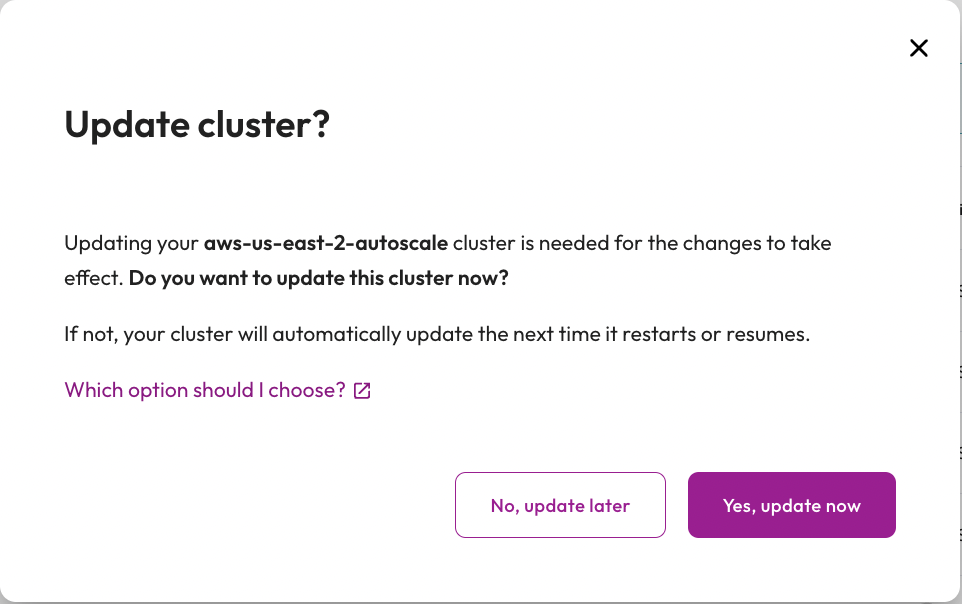
- Click the Save changes button.
- Click the Yes, update now button.
Step 6: Monitor the scale-down
Time to flip back to the Cluster Overview to see the changes take effect.
You will notice 1 worker as soon as the new Free-Tier cluster is started.
- Return to the Cluster Overview tab to monitor the scaledown.
- Move to the next step when complete.
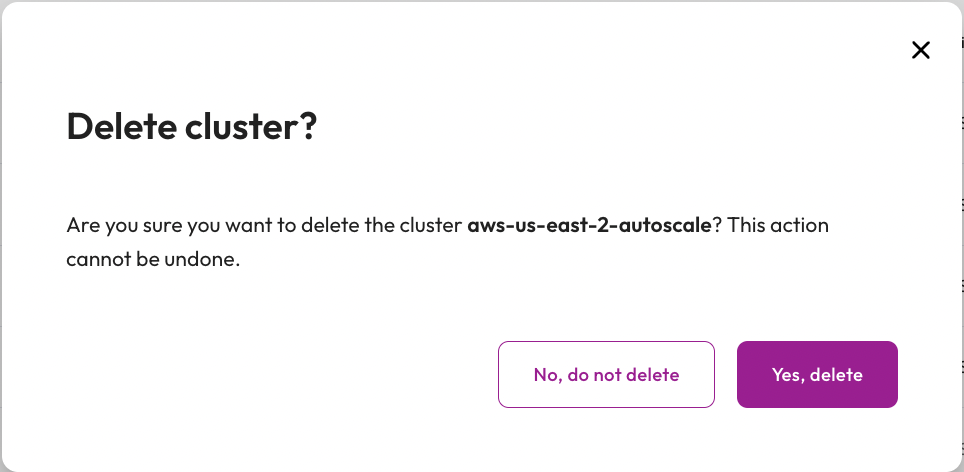
Step 7: Delete the Auto scale cluster
Since we are done with testing, you can delete the cluster you created. This will help ensure that you don't incur any unexpected costs.
- In the Starburst Galaxy tab, click the ellipses to view the cluster menu for the
aws-us-east-2-autoscalecluster. - Select Delete cluster.
Tutorial complete
Congratulations! You have reached the end of this tutorial, and the end of this stage of your journey.
Now that you've completed this tutorial, you should have a better understanding of non-disruptive cluster scaling with Starburst Galaxy.
Continuous learning
At Starburst, we believe in continuous learning. This tutorial provides the foundation for further training available on this platform, and you can return to it as many times as you like. Future tutorials will make use of the concepts used here.
Next steps
Starburst has lots of other tutorials to help you get up and running quickly. Each one breaks down an individual problem and guides you to a solution using a step-by-step approach to learning.
Tutorials available
Visit the Tutorials section to view the full list of tutorials and keep moving forward on your journey!