Background
Across multiple industries, organizations are choosing Starburst Galaxy to power a range of data applications. From real-time cyber threat prediction software to AI-driven recommendation engines, Starburst Galaxy makes accessing your data easy wherever it lives. Whether your first one hundred users, or your next thousand, teams can scale without incurring prohibitive operating costs or sacrificing growth.
Starburst Galaxy
In this tutorial, we will walk you through the process of creating a customer analysis application using Starburst Galaxy and PyStarburst. In this architecture, Starburst Galaxy will act as the engine for collecting, analyzing, governing, and distributing data to users.
PyStarburst and Ibis
Meanwhile, PyStarburst will be leveraged to bring Python functionalities to Starburst, using Ibis as a toolkit for expressing analytical queries.
OpenAI - ChatGPT
Finally, we've integrated with OpenAI to ask some basic questions in natural language. This will allow the data app to integrate with artificial intelligence using ChatGPT and Starburst Galaxy.
Scope of tutorial
In this tutorial, all of the required code is provided for you. To make use of it, you will need to clone the GitHub repository. You will also need to edit the code to make it unique to your environment. Finally, as this tutorial uses AI, you will also need to generate an OpenAI API key to allow connectivity between the data application and ChatGPT.
Learning objectives
Once you've completed this tutorial, you will be able to:
- Use Starburst Galaxy, PyStarburst, and ChatGPT to create a powerful customer analysis application.
- Explain the role that Starburst Galaxy and PyStarburst play in running a data application.
Prerequisites
- You need a Starburst Galaxy account to complete this tutorial. We're going to use the built-in
free-tiercluster,samplecatalog, andburstbankschema which contains mock customer data.
If you do not have a Starburst Galaxy account already, please see Starburst Galaxy: Getting started for instructions on setting up a free account. - You need an OpenAI account to integrate the data application with ChatGPT and add natural language to it.
Background
Before you jump into the tutorial, it's important to understand the functionality of the customer analysis app that you're going to build.
This data application will provide several core functions.
Core functions
- Provide a Business Intelligence (BI) interface capable of "slicing and dicing" a sample dataset.
- Include the ability to slice customer counts by State and credit risk appetite.
- Integrate with ChatGPT, allowing the user to ask natural language questions about the data.
- (Optional) Allow transformed data to be written to a data lake.
Overall Goal
The ultimate goal of the data app is to understand customer segmentation by state and risk appetite.
Background
It's time to get started. You're going to begin by cloning the GitHub repository. It contains all of the code you need for this tutorial.
Step 1: Clone pystarburst-examples repository
The pystarburst-examples GitHub repo contains all of the code needed to complete this tutorial. You are going to clone it to gain access to this code.
- Open a terminal window.
- Run the following command to clone the repository:
git clone https://github.com/starburstdata/pystarburst-examples.gitStep 2: Rename .env.template file
Next, you need to change to the pystarburst-examples/apps/gradio/customer_360_ml directory so that you can rename the .env.template file. In this step, you'll remove the .template from the file name.
Later in this tutorial, you'll edit this file and add your own environment details.
- Change directories using the following command:
cd pystarburst-examples/apps/gradio/customer_360_ml- Edit the file name using the following command:
mv .env.template .envBackground
Now that you've cloned the pystarburst-examples repository, we strongly suggest that you review the contents of the repo to understand the purpose of the code inside it. To help you, all code files contain comments for your reference.
Review architecture
Understanding the proposed architecture is an important step when building anything. The same is true of the data app you're building in this tutorial.
The following diagram shows the high-level architecture of the app.
Review this diagram and the corresponding notes below for more details about the main components of the app.
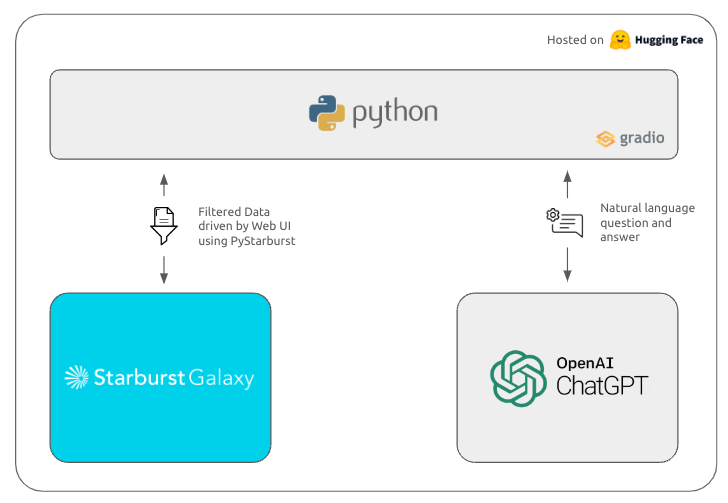
Gradio
Gradio is a Python library that allows you to quickly create a User Interface (UI) for machine learning models. It provides a simple interface to help you build web-based applications that interact with your models. This allows users to input data, make predictions, and see the results in real-time.
Review the app.py file to see how Gradio is being used. You can find more information about Gradio and its API on gradio.app.
PyStarburst
PyStarburst brings the power and flexibility of Python to Starburst Galaxy. You are going to use PyStarburst to tie together all of the components of your data app.
To prepare for this, review the dataModels.py file to understand how PyStarburst will be used to build your data app. Take note of the way that Starburst Galaxy leverages Python DataFrames to achieve these results. This approach pushes all of the heavy lifting to Starburst Galaxy, but uses PyStarburst to achieve it.
Importantly, the code also includes a custom handler to manage the application's data. A class has been created to handle the most common tasks for future reuse in other applications. The main reason for this was to abstract the front end logic from the backend logic.
OpenAI
OpenAI's ChatGPT is used to add natural language analysis to the application. This will allow an AI-driven interface to your data app.
Review the mlModels.py file for more information on how ChatGPT will be used.
Background
Time to get started in Starburst Galaxy. This section walks you through the process of locating your Starburst Galaxy cluster user and host URL.
Later in this tutorial, you will edit the .env file to include your Starburst Galaxy cluster user and host URL. You will also add your OpenAI API key.
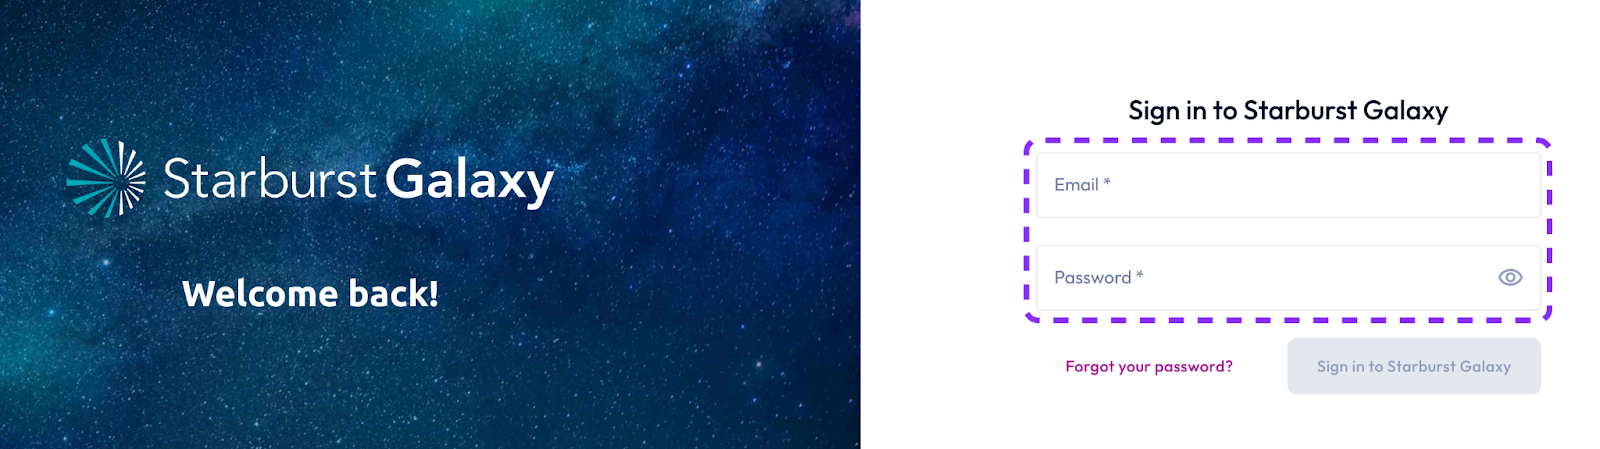
Step 1: Sign into Starburst Galaxy
Sign into Starburst Galaxy in the usual way. If you have not already set up an account, you can do that here.
- Input your Email and Password.
- Click the Sign in to Starburst Galaxy button.
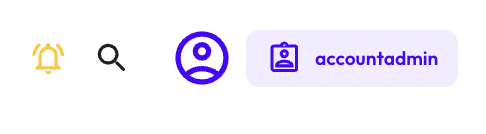
Step 2: Set your role
Starburst Galaxy separates users by role. Your current role is listed in the top right-hand corner of the screen.
Setting up a data app with Starburst Galaxy will require access to a role with appropriate privileges. Today, you'll be using the accountadmin role.
- Check your role, to ensure that it is set to accountadmin.
- If it is set to anything else, use the drop-down menu to select the correct role.
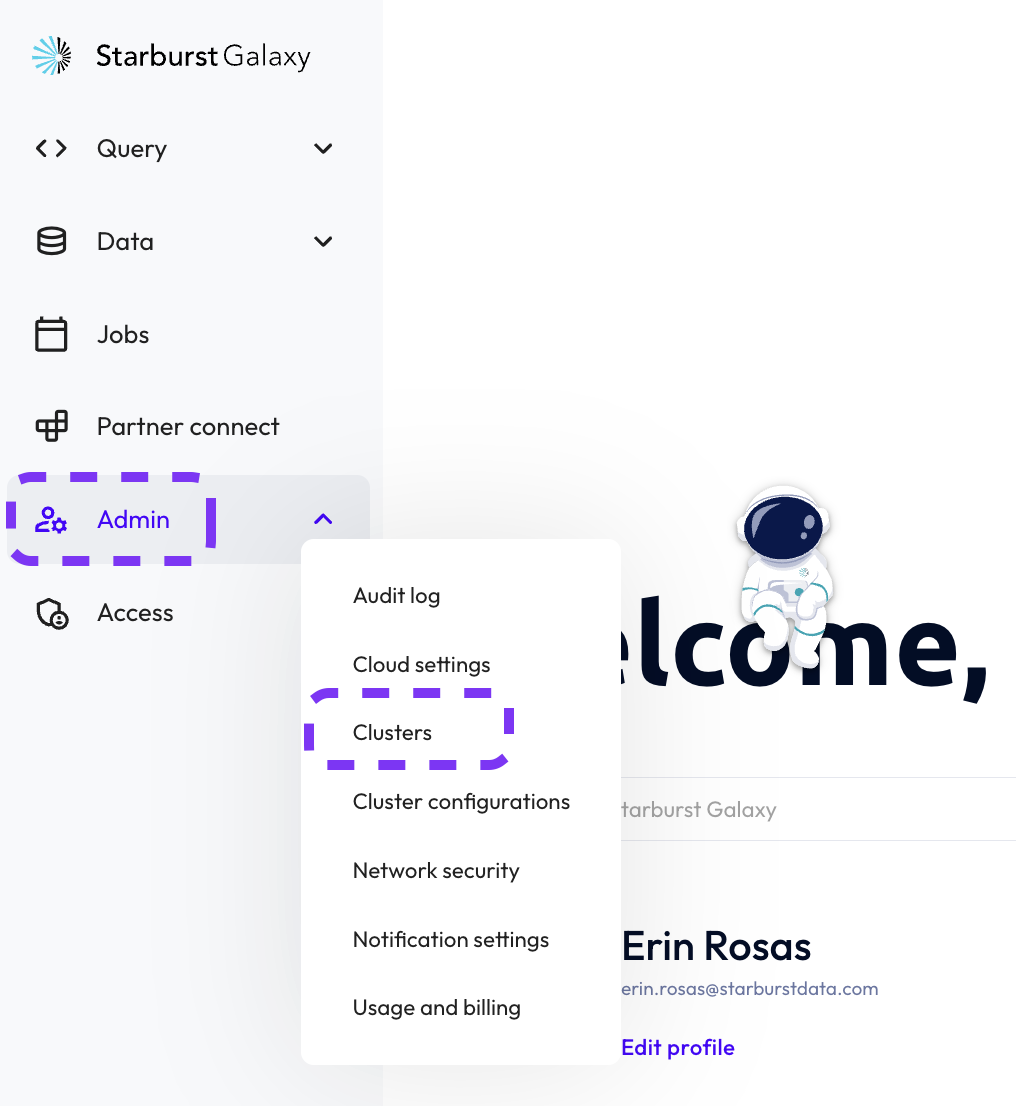
Step 3: Record cluster connection information
The cluster connection information can be found in the Clusters section of Starburst Galaxy. This tutorial uses the built-in sample cluster.
- Hover over the left-hand navigation menu to expand it.
- Select Admin>>Clusters.
- Click the Connection info button for the
samplecluster. - In the Connection information section,copy the User and Host,
- Store these details in a text editor for later use.


Background
Next, you'll need an OpenAI secret key to integrate your application with ChatGPT. This section outlines the steps needed to generate a new key.
Step 1: Sign into OpenAI
If you don't already have an OpenAI account, you can easily sign up for a free one.
- Sign in to your account here.
- Select the API tile.
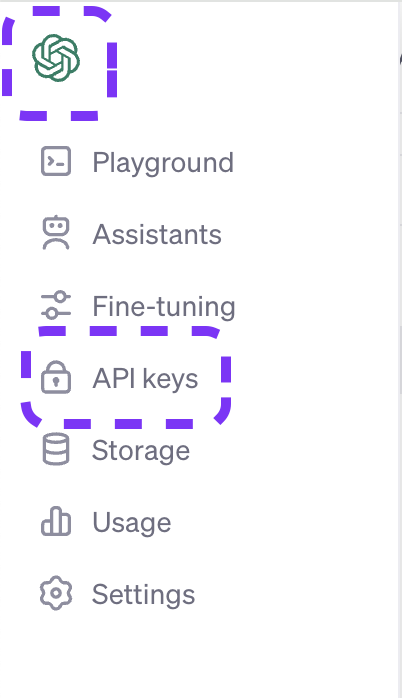
Step 2: Generate new API key
OpenAI allows you to generate an API key. This will allow you to connect ChatGPT functionality to your data app.
- Expand the left-hand navigation menu by hovering over it.
- Select API keys.
- Click the + Create new secret key button.

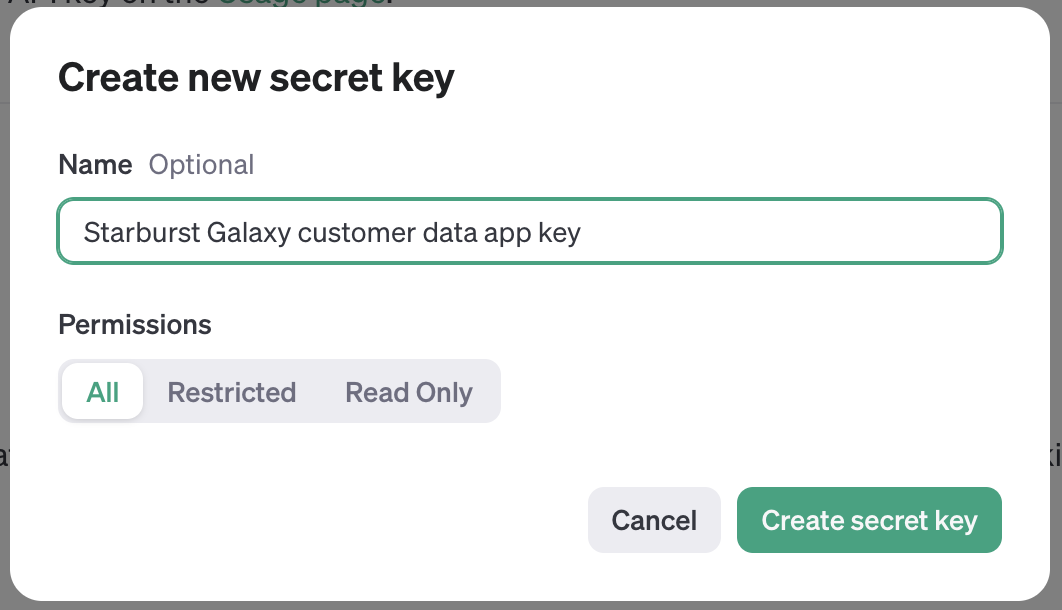
Step 3: Save key
It's time to give your key a name and save it in a safe place. We recommend usinga password vault.
- In the Name field, provide a meaningful name for your key.
- Click the Create secret key button.
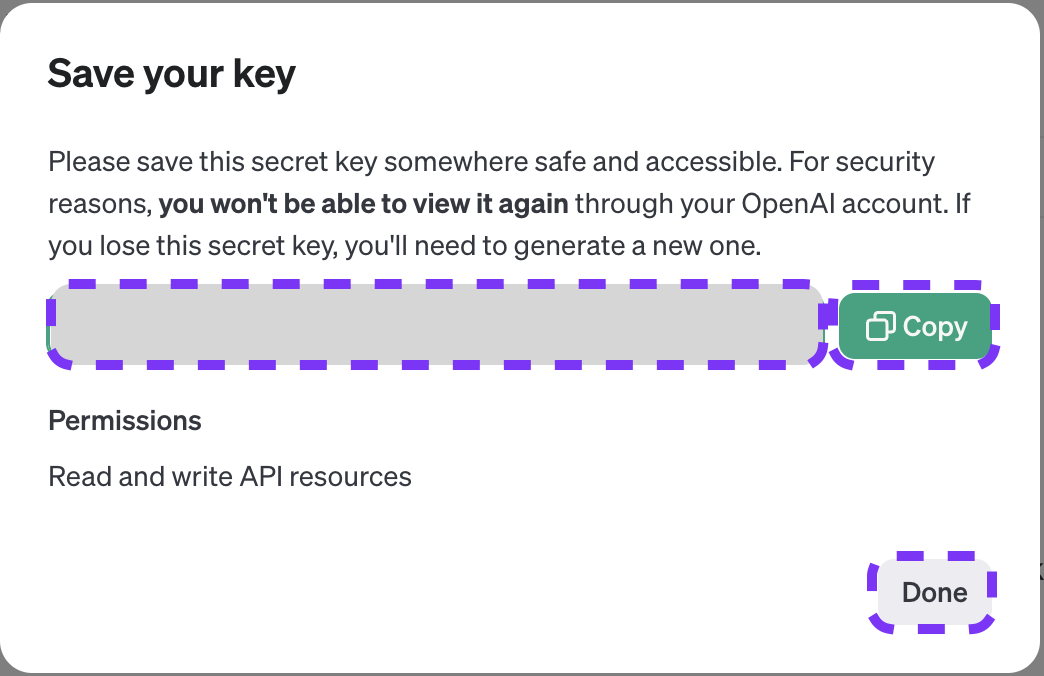
- Copy the key and save it in a safe place for later reference.
- Once you have saved your key, click the Done button.
Background
You've gathered all the information that you need. Now it's time to set your environment variables in the .env settings file. To do this, you'll edit the file and add the values that you just recorded.
Step 1: Edit .env file
You can use your preferred text editor to edit the file. These instructions show how to use the nano text editor.
- Run the following command in your terminal to open the file with the
nanotext editor:
nano .env- Inside the file, replace
free-cluster-demo.galaxy.starburst.iowith your cluster's host name. - Replace
user@demo.com/accountadminwith your cluster user. - Replace
sk-addyourkeyherewith your OpenAI API key. - Type
CTRL+oto save your changes to the file. - Type
CTRL+xto exit the nano text editor.
# This file is a template for the .env file that should be created in the root of the project
# It contains the settings used by our application using Python's dotenv package
HOST="free-cluster-demo.galaxy.starburst.io" # Replace with your cluster's hostname
SB_USER="user@demo.com/accountadmin" # Replace with your Starburst Galaxy username (email) and role name (accountadmin)
OPENAI_API_KEY="sk-addyourkeyhere" # Obtain and OpenAI API key from https://platform.openai.com/signup and replace this value (it'll look like with sk-****)
Background
A Python virtual environment is a self-contained directory containing both a specific Python interpreter and its associated libraries and scripts. This allows you to work on a Python project with its own set of dependencies, isolated from the system-wide Python interpreter and from other projects.
Virtual environments are particularly useful for managing dependencies and ensuring that your project runs correctly. They also make it easier to share and reproduce your project's environment, as you can create a requirements.txt file listing all dependencies. This can be used to recreate the environment on another machine.
Step 1: Setup Python Virtual Environment
It's time to set up the Python virtual environment. To do this you need to begin by navigating to the pystarburst-examples/apps/gradio/customer_360_ml directory.
Instructions for MacOS & Linux users
- In your terminal window, run the following command to change the directory.
cd pystarburst-examples/apps/gradio/customer_360_ml- Run the following command to create the virtual environment.
python3 -m venv .venv- Run the following command to activate the virtual environment.
. .venv/bin/activateInstructions for Windows users
- In your command window, run the following command to change your directory.
cd pystarburst-examples/apps/gradio/customer_360_ml- Run the following command to create the virtual environment.
python3.exe -m venv .venv- Run one of the following commands to activate the virtual environment.
# Windows command prompt
.venv\Scripts\activate.bat
# Windows PowerShell
.venv\Scripts\Activate.ps1
Step 2: Install dependencies
Now it's time to install the requirements.txt file. This will install all of the packages needed to run the environment.
Unlike the previous step, this command is the same, regardless of operating system.
- Run the following command to install the required packages.
pip install -r requirements.txtBackground
You've completed all the setup requirements. Now it's time to see the customer data application in action!
Step 1: Open data application
At this point, you should still be in your Python virtual environment.
- Run the following command to start the application.
python app.py- Open the following link to view the application: http://127.0.0.1:7860.
Note: You will be prompted to sign into your Starburst Galaxy account first.
Step 2: Use data app
The data app's primary objective was to slice data and display it using a BI-like interface. It also allows you to understand customer segmentation by state and risk appetite, your main objective in building the app.
- Confirm that the app looks similar to the image below.
- Explore the app and use the filters to understand customer segmentation by state and risk appetite.
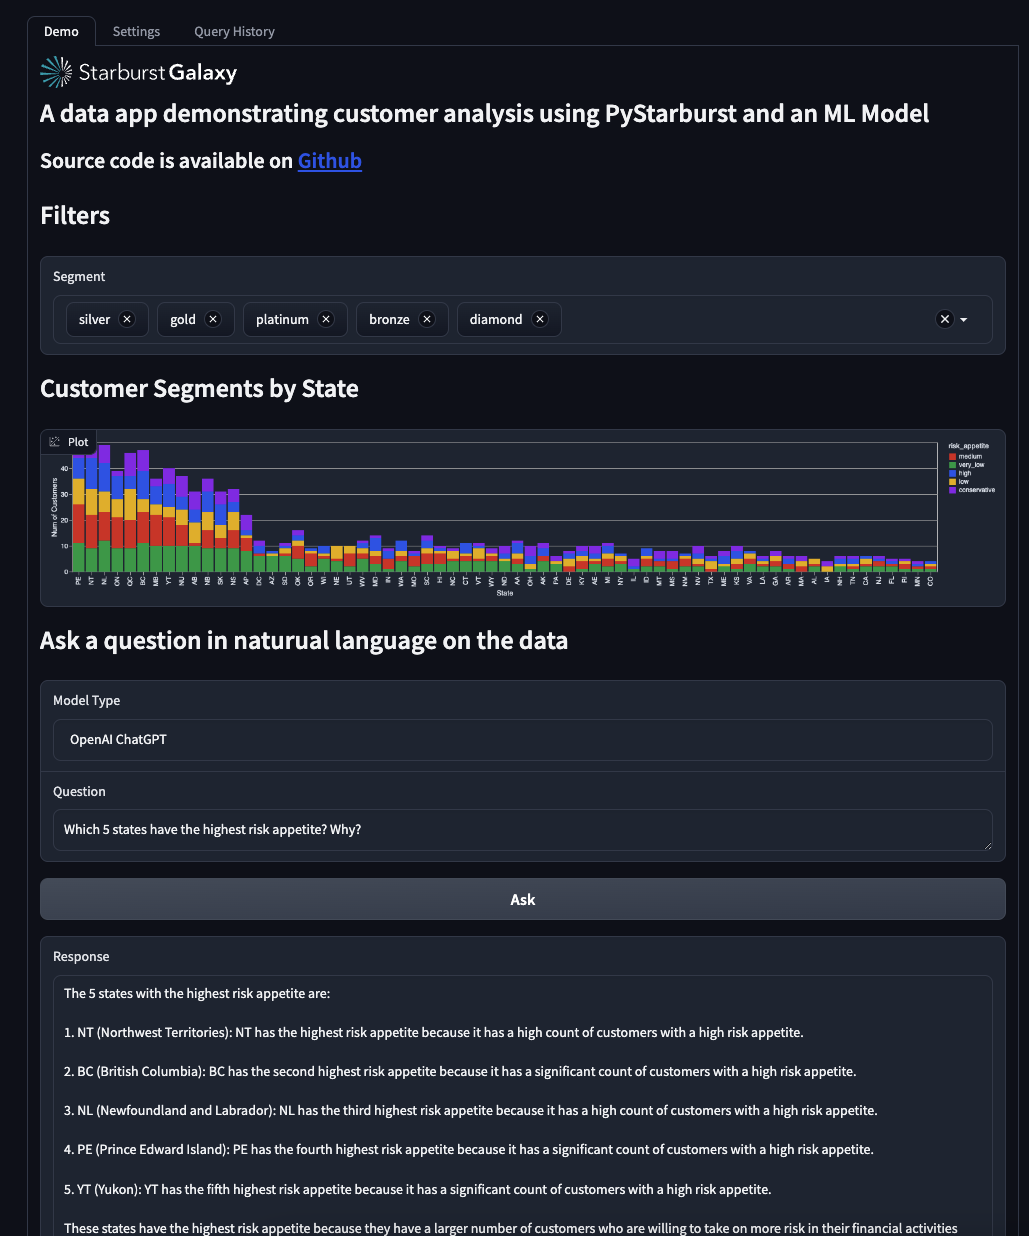
Step 3: Explore natural language feature
The app's integration with ChatGPT allows you to ask questions about the data set in plain english. A sample question has already been included with the app.
- Use the Natural Language section to ask questions about the data set.
- Experiment using natural language to understand customer segmentation by state and risk appetite.
Tutorial complete
Congratulations! You have reached the end of this tutorial, and have successfully built and deployed a customer analysis application using Starburst Galaxy, PyStarburst, and ChatGPT.
Next steps
Want to see more Starburst powered data applications in action? See how Vectra is paving the way in cybersecurity with their AI-driven threat detection and prevention platform, powered by Starburst Galaxy.
Other Tutorials
Visit the Tutorials section to view the full list of tutorials and keep moving forward on your journey!